

A Faster & Better QA Process Through the Use of Mind Maps

It’s a common misconception that you don’t need to bring QA in until the end of your project. Once development is near completion, QA comes in, writes test cases, and begins their frenzy of testing. Yes, that can work, but there’s a better way to do things.
The truth is, the earlier you catch a bug, the less expensive it’s going to be to fix. What if you could catch bugs at the spec level, before the developer even begins coding? Think about it.
"The truth is, the earlier you catch a bug, the less expensive it’s going to be to fix."
For every bug found during your testing phase, how much time is spent on it? Your QA engineer has to take time to log the bug, the developer has to fix it, and then QA retests it. There may be multiple iterations of this or your solutions architect (SA) might get involved. The time adds up and that one bug gets pricey pretty quick. However, if your team is able to find that issue early, all it takes is a few minutes to update a spec or rework requirements before time is sunk into building faulty functionality. We’re constantly on the lookout for ways to evolve our QA practices and one method that we’ve found to be very successful in finding avoidable issues is the use of mind maps.
Breaking Down Mind Maps – What Are They Exactly?
Simply put, a mind map is a visual representation of your requirements. You may have used them to organize thoughts or take notes during a lecture. For our QA purposes, they’re used to cull important information from a spec. Long lists and paragraphs of requirements are appropriate for some stages of your project but by the time you get to development, you want to eliminate ambiguity and have direct and clear instructions. Additionally, each end point in a mind map corresponds with a test case that can be used by QA in their testing and by your developers for writing unit tests.
What is a mind map?
A mind map is a visual representation of your requirements. For QA purposes, they’re used to cull important information from a spec. Each end point in a mind map corresponds with a test case that can be used by QA in their testing and by developers for writing unit tests.
As lead QA on a project, my approach is to sit down with the lead developer and go through each requirement ticket line by line. Why the developer and not the SA? There’s a few reasons. For one, it forces us to read through the ticket in depth. If there are details that just exist in the SA’s head and never made it into the spec, we can find those gaps and get clarification up front. The developer also gets the opportunity to think through their implementation strategy in advance and identify any requirements that conflict with technical realities. These concerns are then surfaced while there is still time to course correct and we can ensure that everybody is on the same page about the requirements. We’re, essentially, QA-ing the specs.
I am also a big fan of the symbiotic relationship that this forms between the developer and QA. When I’m testing, I have a million questions to pester my devs with. Trying to track them down late in the game, while I’m in the thick of testing, can be difficult. Writing mind maps won’t bring up every question I’m going to have but it gives me a chance to get some of them out of the way while we’re working together. In return, the developers get QA insight into their unit testing. You’ve probably heard the joke: “QA Engineer walks into a bar. Orders a beer. Orders 0 beers. Orders 999999999 beers. Orders a lizard. Orders -1 beers.” Your QA person is much more likely to think of these negative and edge test cases that may not be accounted for in the spec. These can then get planned for and written into the code from the get-go. I’ve also had developers tell me that just the process of talking out loud through the ticket together is extremely helpful for them. Sometimes just hearing yourself say something or getting a different perspective on it may give you a better understanding of the ticket or insight into what information is still needed to implement it.
Benefits of Mind Maps: Why Should You Use Them?
Improved Efficiency
Speaking as the QA engineer that then goes on to test using the mind maps I’ve created, I’ve found that the remainder of my time spent on the project is used much more efficiently. If the developer has used the map to cross-check themselves before marking a ticket as complete, there’s far less likelihood of there being any simple bugs for missed requirements. As a result, I can focus more time on testing and can get creative to find the less obvious issues. I’m less likely to have to put testing on hold while I track down an SA to answer questions as much of this will have already been handled.
The map also provides me with an outline that I can follow to organize my test suite, giving me one less thing to have to think about when it comes writing my test cases. In very fast-paced projects (especially those that follow an agile model), I will just use the map as my test plan, coloring in the bubbles to indicate their pass/fail status. This also allows for my time to be more evenly spaced out across the lifecycle of the project, which makes it easier to handle competing priorities if I am a shared resourced across multiple teams.
Knowledge Sharing
Mind maps are also a great way to share information across the team. On a lot of projects, I may not be the one who does the actual testing. I can hand the map off to my teammate, knowing that it will inherently account for whatever information I’ve gathered up to this point and that there will be adequate test coverage. I can send the maps to the SA so that they can verify that my interpretation of the tickets is correct without having to read through all of my individual test cases. Clients can also use the maps to plan out their UAT testing, as the maps provide an idea of the test coverage for a given requirement. Some project managers like to quickly test features themselves before UAT and the map also gives them an idea of what to look for.
In a similar vein, we’ve used mind maps to document legacy projects that had no existing documentation. For these cases, I usually sit with the SA instead of or in addition to the developer and have them recite everything they know about the project. As they talk, I organize their thoughts into a mind map that we then use to write regression plans or share with new additions to the team to ramp up on the project.
Time & Cost Savings
I can already hear the project managers out there asking if this is going to add a lot of overhead to their budgets. While this method does incur more hours upfront, it can provide a lot of hours and costs saved in the long run. Test case writing will go faster. Testing will go faster. There will be less time spent on bug fixing. We’ve had a few projects recently that introduced mind maps between agile sprints and there was a drastic improvement from one sprint to the next. What had previously been a very difficult testing period for both QA and developers went so much more smoothly the next time.
"While this method does incur more hours upfront, it can provide a lot of hours and costs saved in the long run. Test case writing will go faster. Testing will go faster. There will be less time spent on bug fixing."
Creating Mind Maps – How Do You Get Started?
Now that I’ve (presumably) sold you on mind maps, how can you go about creating one? Honestly, it’s much more of an art than a science and there are no rigid instructions. I like to build one map per requirement ticket but you can create big, complex maps with lots of information or a bunch of small ones. The basic guidelines are to group related functionality together and branch at every decision point.
Below is an example of what your map may look like. Here we have a “featured page” component where you can select a page to highlight and display relevant information. You have multiple page templates across the site, only some of which allow this component to be added and only in certain column placeholders. Besides selecting a page to feature, the author has the option of providing override values for fields that will be pulled from that page. The author also has options to display or hide certain elements. When a user accesses the page, they can only see this component if they are logged into the site. The content they see displayed within the component depends on what configuration options the author used. Diagraming these requirements into a mind map will give you something like this:
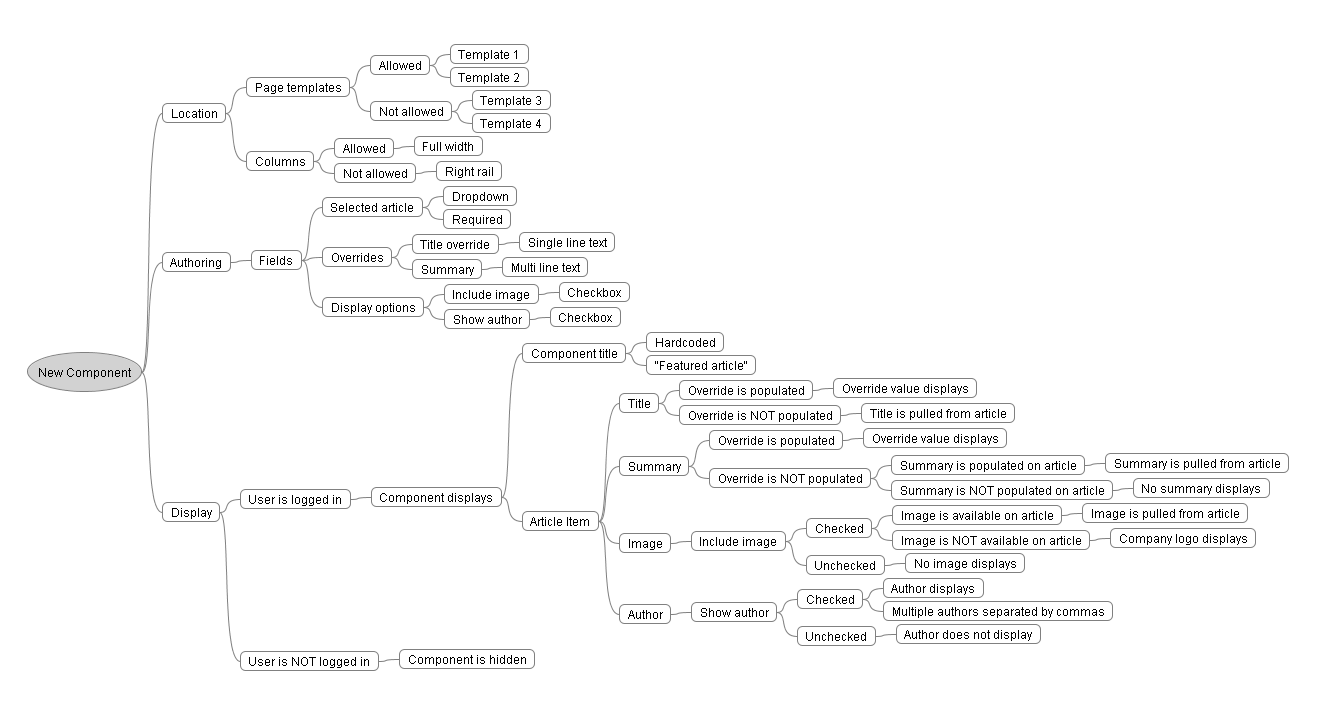
If you don’t know where to start, just take it one phrase or sentence at a time. Does the sentence give you any actionable information? If so, add it to your map. Once you have a bit of information on there, you might start to notice similar items that you can group together. Eventually, you’ll find the process evolving into pattern recognition.
If your ticket has distinct line items, each will likely be a line on the map. If you encounter the word override, you’ll need a fallback chain to describe it. You can see these in the example where each of the fields displayed, branches into options for using an override or the fallback behavior. Whenever you see entitled behavior described, you’ll also want to depict what unentitled behavior looks like. In this example, unentitled users aren’t even able to see the component. There is no right or wrong, as long as everyone is able to look at the final map and draw the same conclusions.
Once your map is done, you’re ready to add it to your requirement ticket so that it’s available to all your team members. Your developer can now write the code for this component, while your QA engineer writes the test cases and goes on to test the associated functionality.