

Behavior-Driven Testing in Drupal 8

In a previous article, I extolled the virtues of testing using the test-driven development concept and Drupal's SimpleTest framework. The article discussed how to plan out what your code should be doing, write cases to assert that different parts of your code are working as expected, and use this as a guide for expanding your code.
Behavior-Driven Development
But what if I told you there is an easier way to determine what your tests should be, and a simpler way to write these tests? What if a QA engineer or solutions architect was able to assist in writing the tests instead of this activity being constrained to only a developer?
Well, fortunately, there is a way! Returning to the custom module - if you start thinking about it at a conceptual level and defining the parameters of behavior(s) at a higher level, test cases can be created from the very issues that drive feature requests.
"When you start thinking about how your code should behave, and not the finer details of how to get it there, then you're utlizing the basic principles of behavior-driven development."
What makes behavior-driven development unique is that just about anyone can contribute to writing tests to be implemented. Unlike the approach in the previous post, which utilizes SimpleTest to create the tests, you don't need to know PHP in this scenario. You don't even need to have Drupal/PHP installed on your machine to contribute testing scenarios for development. The only thing you need to be able to do is accurately describe how you expect your features to behave under different circumstances.
Let's take a basic example - our fruit form. Let's assume the conversation began by requesting the creation of a freely-accesible page at "/testmodule/ask-user" with the title, "Fruit Form". The page needs to obtain two pieces of information from visitors - their favorite fruit and their email address.
This request can be broken down into a Feature containing multiple Scenarios, which we will hash out in a bit. To assist with this, install the Behat Drupal Extension, which provides dozens of Drupal-specific definitions and tools to make testing easier.
Behat & the Drupal Extension
For PHP, a handful of frameworks exist for implementing behavior-driven development. My favorite, by far, is Behat. In a nutshell, Behat allows you to define tests in plain English that will be executed. It doesn't really care about the underlying implementation, only that users are able to do what they are expected to be able to do. You can think of it like testing at a 30,000 foot level.
Step definitions
A step definition is a statement, formatted as either a condition, action, or result, that is evaluated by Behat. For example:
Given I am logged in as an administrator
When I am on the account page
Then I should see the heading, "Welcome back, admin!"
The Drupal Extension comes packaged with all the necessary items to get started. It also provides numerous step definitions for Drupal for actions like creating content or sample users that can be used during testing (they will be removed automatically when the tests complete).
Some of the bigger advantages to using Behat over SimpleTest are the sheer speed at which you can do repeated testing and the ability for just about anyone in the project to contribute towards writing behavior tests. Unlike SimpleTest, Behat executes in the current environment and does not need to bootstrap and install a sandboxed Drupal instance every time you run a test. Depending on the size of your application and the number of things you are testing, this can reduce a complete test run from many hours to a fraction of that, with the same level of quality that SimpleTest provides.
Using an IDE like PHPStorm will also allow you to pick and choose which test suites to run, or particular parts of a test to re-run, which further reduces the time it takes to evaluate tests. You should take full advantage of all the debugging and testing tools that PHPStorm provides, as they will save you a lot of time and make you a more efficient developer.
Installing the Drupal Behat Extension
Getting the extension is quite simple now that Drupal has composer integration for managing dependencies. At the project root in your console, simply type:
composer require drupal/drupal-extension:~3.0Your composer.json file will be updated accordingly and the extension will be downloaded to the vendors folder.
Setting-Up the behat.yml Configuration
Behat needs a little information about your project, and what to use when running the tests. Here is a sample configuration, which tells it about the Drupal driver from the Drupal Behat Extension:
default:
   suites:
     default:
       contexts:
         - FeatureContext
         - Drupal\DrupalExtension\Context\RawDrupalContext
         - Drupal\DrupalExtension\Context\DrupalContext
         - Drupal\DrupalExtension\Context\MinkContext
   extensions:
       Behat\MinkExtension:
         goutte: ~
         javascript_session: selenium2
         selenium2:
           wd_host: http://127.0.0.1:8643/wd/hub
         base_url: http://local.velir.com
       Drupal\DrupalExtension:
         blackbox: ~
         api_driver: 'drupal'
         drupal:
           drupal_root: '/var/www/docroot'
The Drupal driver will be the default for almost every test you write. Note that there is an included configuration for Selenium as well, which will be used for testing interactions that require javascript and a fully functional browser. This will be discussed further in a future article.
Features & Scenarios
At a basic level, you need to break down aspects of your application into Features, and every Feature should be composed of Scenarios that you want to test for. Scenarios represent small actions that a user should be able to execute using the parent Feature.
Using the same custom form module that was built in the previous post as the Feature you need to implement, assume that no code has been written for it yet and apply the concepts of behavior-driven development instead. First, you need to hash out what you want to accomplish from a user's perspective:
- The fruit form router URL is accessible to anyone
- The fruit form router URL presents a form
- The fruit form select options are all present and available to the user
- The fruit form has a submit button
- The user picks an option and enters their email address, sees a confirmation message upon submit, and is redirected to the homepage
These are high level actions that describe this Feature and behaviors that the user expects to be able to perform using it, along with the related behaviors that are anticipated in response from the system. From here, you can rewrite these requirements into Scenarios:
Feature: Test the Fruit Form
  In order to submit my favorite fruit and email address
  As a visitor
  I need to be able to use the fruit form

  Background:
    Given I am on "/testmodule/ask-user"

  Scenario: Visiting "/testmodule/ask-user" displays the fruit form
    Then I should see the heading "Fruit Form"

  Scenario: The fruit form displays a select field for favorite fruit
    Then I should see an "#edit-favorite-fruit" element

  Scenario: The fruit form displays an email address field
    Then I should see an "#edit-email-address" element

  Scenario: The fruit form question field has all of the options we expect
    When I go to "/testmodule/ask-user"
    Then I should see "Apple" in the "#edit-favorite-fruit" element
      And I should see "Banana" in the "#edit-favorite-fruit" element
      And I should see "Blueberry" in the "#edit-favorite-fruit" element
      And I should see "Grapes" in the "#edit-favorite-fruit" element
      And I should see "Orange" in the "#edit-favorite-fruit" element
      And I should see "Strawberry" in the "#edit-favorite-fruit" element

  Scenario: The fruit form displays a submit button
    Then I should see the button "Submit!"

  Scenario: User sees successful message on the homepage after submitting
    When I enter "Blueberry" for "edit-favorite-fruit"
      And I enter "[email protected]" for "edit-email-address"
      And I press the "Submit!" button
    Then I should see the text "Blueberry! Wow! Nice choice! Thanks for telling us!" in the "highlighted" region
      And I should be on the homepage
Essentially, you define what your Feature is at the top of your test with a summary of what it should do. Each bullet point is broken down into a Scenario, and within each Scenario is a series of step definitions Behat will check against to confirm that the Feature is working. Since we have installed the Drupal Behat Extension, we have access to many handy Drupal-specific steps, and we can also test for expected elements or text in a Drupal theme region.
It did not take much to transform that list of requirements into these statements. Working together with your project manager, solutions architect, and/or QA team, you can find a lot of synergy between creating feature requests in your issue tracker and providing meaning by transposing requirements into a format like this.
You can then run them at any time from PHPStorm, or from the command line if you wish.
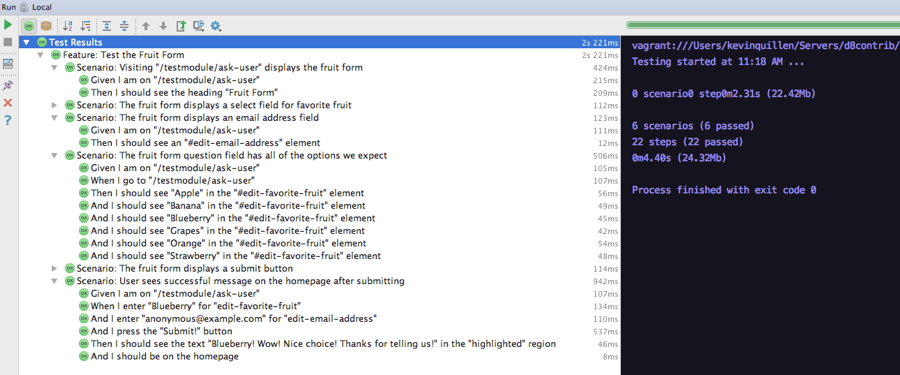
Look how quickly it evaluated the test!
Running all of the scenarios in this feature took just four and a half seconds! When you factor in the possibility of having multiple tests for multiple features, coupled with the fact that you can selectively run any test/specific scenario in a feature on demand, it's not hard to imagine the vast amounts of time being saved over SimpleTest or manual testing. The ability to get test feedback quickly is a significant win for any developer.
Providing Test Data
Take a look at some of the things you can do out of the box with Behat. If you need something that doesn't exist, it is very easy to extend Behat, describe your custom steps, and what it needs to do. For example, it can create test data within your scenarios, nodes, terms, users, and use it in a test.
Consider the following from the examples:
  Scenario: Create and view a node with fields
    Given I am viewing an "Article" content:
    | title | My article with fields! |
    | body  | A placeholder           |
    Then I should see the heading "My article with fields!"
    And I should see the text "A placeholder"

  Scenario: Create users
    Given users:
    | name     | mail            | status |
    | Joe User | [email protected] | 1      |
    And I am logged in as a user with the "administrator" role
    When I visit "admin/people"
    Then I should see the link "Joe User"

  Scenario: Login as a user created during this scenario
    Given users:
    | name      | status |
    | Test user |      1 |
    When I am logged in as "Test user"
    Then I should see the link "Log out"
Each one of these scenarios is signaling to create test data in its Given step. The Drupal Behat Extension will create and destroy the test data automatically for you after each scenario is completed.
Here is an example from a project we completed earlier this year. In this example, I am using Background to make two page nodes available in every scenario. It serves as a smoke test to quickly check that anonymous visitors can :
- Access published page type content
- See common field values printed on the page in the right regions
- Navigate to the expected URLs
- Not view unpublished content, and get an access denied response
Feature: Page Content Type (Anonymous)
  When I view the website
  As an anonymous user
  I should be able to view basic page content and its fields

  Background:
    Given "page" content:
      | title                     | status  | body             |  field_subtitle       |  field_summary            |
      | Published page            |       1 | PLACEHOLDER BODY |  This is the subtitle |  This is the page summary |
      | Unpublished page          |       0 | PLACEHOLDER BODY |  This is the subtitle |  This is the page summary |
    And I am on "published-page"

  Scenario: An anonymous user should be able access published basic page content
    Then I should not see "You are not authorized to access this page."

  Scenario: An anonymous user should be able to view the title
    Then I should see "Published page" in the summary region

  Scenario: An anonymous user should be able to view the subtitle
    Then I should see "This is the subtitle" in the summary region

  Scenario: An anonymous user should be able to view the page summary
    Then I should see "This is the page summary" in the summary region

  Scenario: An anonymous user should not be able access published basic page content
    When I go to "unpublished-page"
    Then I should see "You are not authorized to access this page."
Similar tests exist for other roles such as content editor or administrator. Tests like these to confirm that different roles can execute their basic functions and receive the expected results are quick to write, execute, and automate. They can be run often, and in effect, continously provide feedback that established parts of the system continue to work as expected, while ongoing development occurs.
Conclusion
While behavior-driven tests don't satisfy every kind of test you might need to write for a project, the practice provides another tool in the developer's toolbox for building confidence in code. The time is ripe for learning Behat and Mink as well, as Drupal 8.2.x+ core is making strides to integrate both into the underlying testing framework.
Have you forayed into behavior-driven development with Drupal? Join the conversation and share your experience via the comments below.