

5 Best Practices for Acquia Site Studio Site Builders

In our previous post for ambitious Drupal site builders, we took a look at five best practices for successful Acquia Site Studio deployments. In this one, we’d like to share five best practices for site building in Acquia Site Studio.
Whether you are low code, no code, a site builder, or a developer, the following best practices can help you build Drupal websites faster and more effectively in Acquia Site Studio.
Name Your Component Instances
When defining your website’s components, it's imperative to implement a clear naming convention for each component that you build. Going with just a few generic component names will look neat in the site’s backend, but what happens when site editors use several of the same components on a page? It may look like this.
The name “Divider Line” is pretty clear. It adds a horizontal line on the page. But are you able to tell at a glance which ‘Text’ component contains specific content found on the page? Not without opening each one, which is tedious. Even if you’re using the page builder to manage content, there are cases where you need to use the visual builder on the backend to diagnose issues or resort components on the page, so clear naming conventions are important.
As you create content, name your component instances. Instead of leaving the component label “Text”, each one should have a clear indication of what it contains.


This component instance name would be reflected in the layout canvas and make scanning large pages of components much easier for your whole team.
Avoid Inline Styling
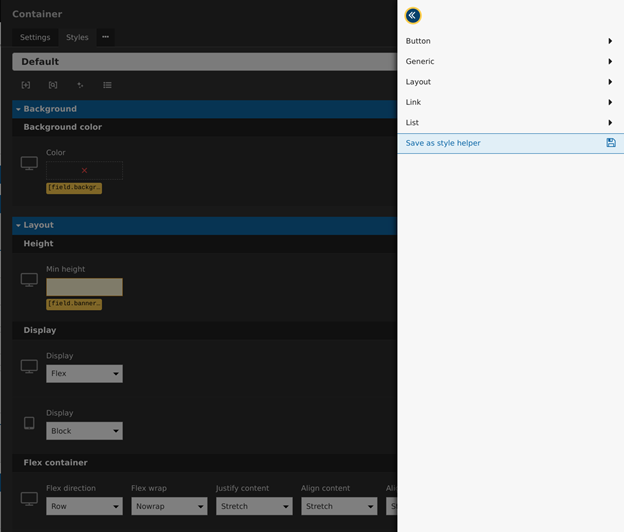
Site Studio makes it easy to use the editor to add inline styles to component instances or templates. This can be a quick way to knock out a design task, but we recommend trying to accomplish this from the style manager of Site Studio. If you make style edits to specific components or templates, it won’t be long before you have inline style scattered all over the place in an unmanageable, non-reusable way.
If you find yourself making style edits often, you should save these styles as a style helper. That way you can re-apply the same styling in the future when the need arises. For long-term maintenance, you should leverage Site Studio’s Style Manager and component definitions instead of applying one-off inline styling.
Template All the Things
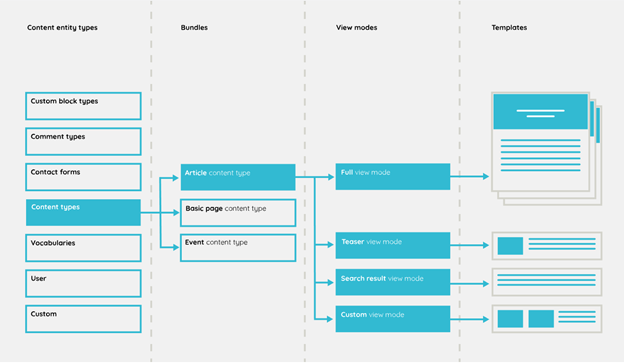
Make extensive use of the templating system within Site Studio to template all the content entities that are defined. Site Studio has options for templating out nodes, users, taxonomy, views, custom block types, and even menu links. You can template out each view mode you define per entity type and use that around the site in different component displays or views. Editors can select which template will be used as the ‘full’ view of a page instead of a default if the need arises.
Templating is not strictly limited to content only. Any content entity type can be templated out—even ones provided by contributed modules like Paragraphs, Groups, Sitewide Alerts, and more. Have a custom entity? No problem—you can register it with the Site Studio API and make it available in the admin user interface for templating.
By templating elements of the site, you can offload some development activity into a low-code/no-code activity for other team members. This also allows you to template on-the-fly without getting down into various Twig templates and other traditional Drupal conventions. It can increase your theming velocity over more traditional means since the results are immediately visible upon saving. You don’t need to deal with dozens and dozens of Twig files, CSS, JavaScript, and preprocess theme override functions just to get the display you want.
Want to create templates for user profiles, search results, or content types that don’t even use layout canvas? No problem. If it exists, Site Studio can template it in the admin user interface.
Use Context Visibility for Greater Flexibility
We mentioned this in a previous post before but it bears repeating here because it provides greater control over displays in components and templates in Site Studio—take advantage of Context Visibility and the Context module.
There will be cases where you want something to show or hide or full sections of a component for a specific user role or other conditions that just cannot be done out-of-the-box with Site Studio. For this, you’ll need to grab the Context module and create some contexts to apply to your components and templates. The “hide if no data” option provided by Site Studio only fits a limited use case—Context can fill the rest of the gaps. Condition plugins are easy to make, and Contexts are easy to assemble in the admin.
Here are two modules we’ve released that work well with Context and Site Studio to provide some flexibility in your displays:
Add Hints and Notes to Component Definitions
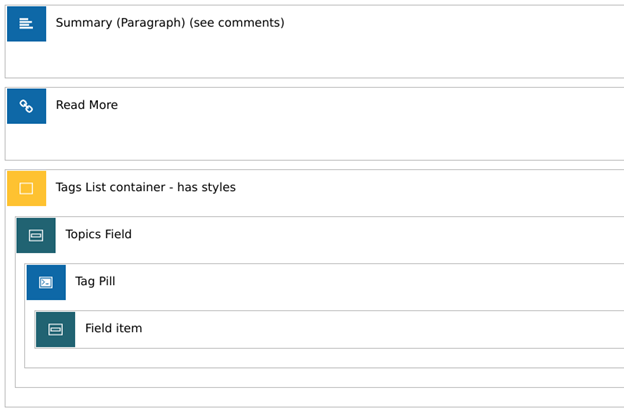
Much like our first point about giving descriptive names to component instances in content, it is also important to add hints and notes in components and templates for everyone on the team. For instance, instead of naming something “Container”—give it a name for what it contains. Additionally, you can note that it has custom styles applied, which can make it easier to track down what Site Studio styles are being applied where. Here is an example from a component.
Anyone on the team who would look through this would know that:
- The first element contains the “Summary” field, and there are notes attached
- The second element is the “Read More” link
- The third element is a “Container” that outputs the taxonomy of a specific field in Drupal, and that this container has custom styles applied in its definition
Without hints and comments trying to track down issues or build more complex components can become more difficult for your team over time. Additionally, you should make use of the “Admin Comments” setting on components to expand on anything other team members should know.

Admin comments point out useful information about extra functionality a component or element may contain, which goes a long way when you’re supporting and maintaining a site build.
Growing Your Website with Your Organization
By following the five best practices we recommend for site builders in Acquia Site Studio, you can create sites that grow more effectively with your organization. You can accomplish this by providing your team members with the information they need to successfully scale your website with new templates, styles, and content. Be sure to give your component instances specific names according to an agreed-upon naming convention, avoid inline styling in favor of style handlers, template your content entities so they can be reused, leverage content visibility for greater flexibility, and add hints and comments to make your components easier for others to understand.
Need help implementing our recommended best practices with your Acquia Site Studio instance? Contact us.