

Custom Item Generator: A Simple Example

In my last post, I introduced the Velir Custom Item Generator which is now available as a shared source module.
In this post we are going to go over a very simple example of installing and using the Custom Item Generator.
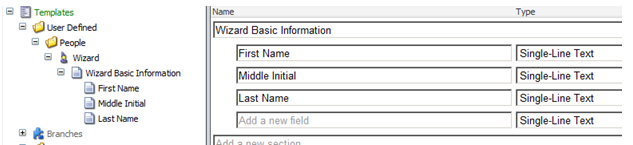
As we go through this example we will use a simple template to demonstrate some of the CIG concepts. This template contains fields that define a wizard's name (The kind of wizard that casts spells.)
This example will cover:
- Installing the Custom Item Generator
- Generating the initial custom item from Sitecore
- Adding an instance method to the generated custom item
- Changing the template and rebuilding the custom item
These steps should show some of the advantages of using custom items, as well as giving a glimpse at a typical workflow using the CIG for Sitecore development.
Installing the Custom Item Generator
The first step in using the Custom Item Generator is installing the package, which can be found in the shared source library here https://marketplace.sitecore.net/en/Modules/Custom_Item_Generator.aspx.
Once the package is installed you will need to make a few configuration changes. The first is adding the following command to the commands.config file located at ~/App_Config/Commands.config
Then you need to add some project specific config settings to the custom item configuration file found at ~/App_Config/Include/CustomItem.config, the settings are as follows:
- Base.Namespace – This is the namespace that is going to be pre-pended to the custom item class names.
- Base.Filepath – This is the local file path to the root of the folder that is going to hold the generated custom item class files.
So say for example we had the following settings:
<base.namespace>MyLibrary.CustomItems</base.namespace>
<base.fileoutputpath>
C:inetpubwwwrootMySitesrcMyLibraryCustomItems
</base.fileoutputpath>
Generating Custom Items
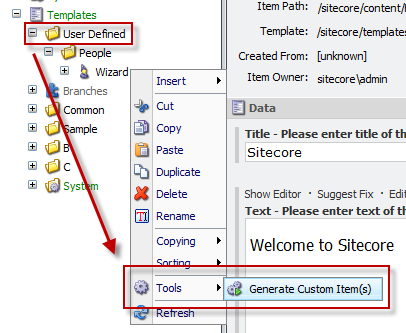
Once the setup is complete we can start creating our custom item classes. To do this we have to right click on the top level folder holding our templates and chose "Generate Custom Items(s)" from the Tools menu.
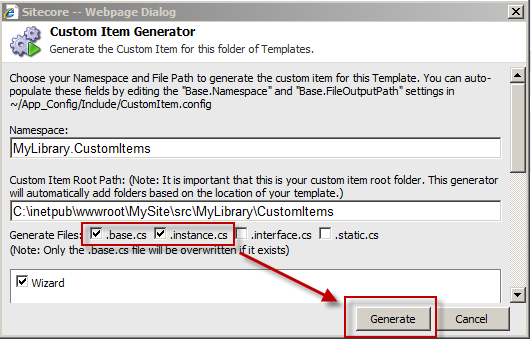
For this example we want to create both the .base.cs file and the .instance.cs file, which will hold an instance method for dealing with wizards.
For our example, the resulting full class name will be:
MyLibrary.CustomItems.People.WizardItemThis path is constructed from the following parts:
- MyLibrary.CustomItems - Comes from the Base.Namespace setting.
- People - Comes from the template folder structure.
- WizardItem - The template name with Item appended per the convention used by Sitecore.
Adding an Instance Method
Now that we have the WizardItem created, we are going to add an instance method that will return the wizard's full name. When we generated the custom item for this template a WizardItem.instance.cs file was created. This is a logical place to put a method that returns a full name, so we will add the following code to the partial class.
public string GetFullName()
{
return string.Format("{0} {1}. {2}",
   FirstName.Text, MiddleInitial.Text, LastName.Text);
}
When you regenerate the custom item class files only the .base.cs file will be overwritten. If you need to put any custom code into your custom items we strongly recommend you do not put them in the .base.cs file, but instead put them in a partial class file like .instance.cs. If you try and regenerate the .instance.cs file and it already exists, nothing will happen. However if you put custom code in the .base.cs file and regenerate it, you will lose said code.
Changing the Template and Regenerating the Classes
One of the advantages of using custom items is that it will allow you to catch some errors during compilation that otherwise may make it to the front end. An example of this would be when a template changes in Sitecore but the corresponding field references are not updated in code. So let's say that the wizard Middle Initial field is being changed to a Middle Name field. We would follow these steps:
- Change the template field name in Sitecore
- Re-generate the custom items
- Fix any broken code
After the first two steps, I will see this in Visual Studio:
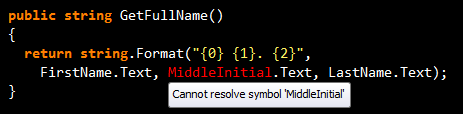
Now I know that the code I have does not match what is in Sitecore. I make the needed changes, and end up with something like:
public string GetFullName()
{
return string.Format("{0} {1} {2}",
   FirstName.Text, MiddleName.Text, LastName.Text);
}
In Conclusion
While this example is simple it demonstrates a common workflow that someone would use when working with the Custom Item Generator. Because our template access is now wrapped in custom items we will know at compile time if our code is broken due to Sitecore template changes. Also, by breaking the code into separate partial class files we provide both a logical structure for our code and allow for regeneration of the template access code without interfering with any custom code we have built.
Next up will be some ways that you can customize the Custom Item Generator.