

The Art of the Sitecore Upgrade

Last week, we hosted a meetup here at Velir for the New England Sitecore User Group on a new way to upgrade a Sitecore website. In case you weren't able to make it, this post gives a brief overview of the talk and additional resources going forward.
Traditionally, a Sitecore Upgrade comprises of upgrading incrementally through each Sitecore point release. Sitecore provides an upgrade package for each revision it releases, along with configuration files, database scripts and instructions to follow.
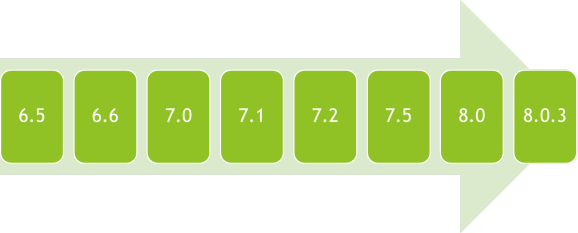
The most obvious problem with these packages is that they can only upgrade your Sitecore one point version at a time. For example, if you want to upgrade from Sitecore 6.5 Update-3 (rev.111230) to Sitecore 8.0 Update-3 (rev. 150427); you have to go through seven upgrade procedures.
Each time you need your solution to build correctly, so that you can hit the site and get to the update installation wizard page “http:///sitecore/admin/UpdateInstallationWizard.aspx”. You need to have separate branches for each version upgrade to revert if things go wrong, you also need database backups for the same reason.
If you haven’t done one yourself, you can imagine a deployment where you build your website seven times from seven branches and do some manual steps between each.
Discovery
It is particularly important to start with a thorough discovery, Sitecore upgrades are not one size fits all and the most important output of the discovery here is to size the upgrade project. This will also help you assess the risks and set the expectations. A few points to consider during discovery:
Prerequisites
Start your discovery by looking at the prerequisites for Sitecore 8, especially Mongo. Make sure that you’re ready to make the move to Mongo or otherwise understand the limitations. There’s a knowledge base article that discusses those limitations.
If you have forms data that you need to migrate to Sitecore 8, there’s a conversion tool that would migrate the DMS and WFFM databases. If you just had WFFM but not DMS you can’t migrate the WFFM database, that’s regardless of how you do the upgrade. I reported that to Sitecore support and they registered it as a wish/feature request with reference number 432610, if you would like to track it.
Discovery Sheet
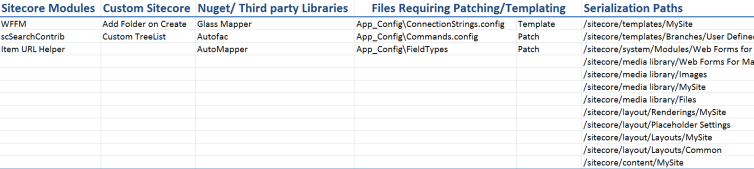
After you’re done with the prerequisites, you need to gather more information about your current Sitecore to see what exactly you will need to upgrade. The best to place to gather this information from is Sitecore’s showconfig page. Then you will create some sheet similar to this one to summarize all your customizations. And for more thorough investigation you can do this:
- Get a Sitecore zip for the old Sitecore you’re upgrading from.
- Compare to your working old Sitecore site.
The output of this comparison should be:
- Identifying additional configuration files (e.g. patch files, template files, index configuration files, …)
- Sitecore modules or third party modules installed
- Modified values for Sitecore configuration files.
- Custom Sitecore classes (they have to have a configuration to point to them).
You need a list of the current Sitecore modules, custom Sitecore, files that require patching or templating, and nuget packages or whatever third party libraries you’re using in your current solution as well as a list of the serialization paths. The effort to upgrade will largely depend on how big these lists are.
Content Migration
After installing the prerequisites and deciding what the target version is; setup a vanilla Sitecore site as described in the Sitecore documentation (or just use Sitecore Instance Manager.)
Sitecore provides serialization and deserialization of items, which is a great way to move content between Sitecore instances; regardless of the Sitecore version. Serialization works by writing all the item fields and hierarchy information to a text file. When you deserialize (revert) the item, you’re creating a new Sitecore 8 item with the fields and hierarchy information from the original item, which is exactly what we need to migrate the content between different Sitecore versions with possibly different database schemas.
Here’s how to get to the serialization ribbon, you will need it in both your old and new Sitecore instances:
- Right click any empty area in Content Editor ribbons
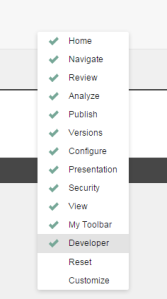
- Check “Developer”

- In the Developer toolbar there’s a “Serialize tree” button and a “Revert tree” button.
To migrate your content from your old Sitecore, you have to visit each serialization path you entered in the discovery sheet and “Serialize tree” which serializes the item and all subitems to the file system as the tooltip says. The serialized files are written to the Data/serialization folder in your old Sitecore; copy that folder to your new Sitecore. In the new Sitecore, you will click Revert tree to create new Sitecore 8 items using the same data from your old Sitecore. You can migrate content items, templates, media items, roles, users… all your Sitecore content can be migrated this way. You can also keep track of the differences between master and web databases by serializing and reverting both.
In some cases the order in which you deserialize the items is important, for example, before deserializing content items deserialize the templates first.
Another way of migrating content is using packages, packages have size limitations, and may have problems across different versions of Sitecore because of schema changes. I prefer serialization as it doesn’t have those size limitations and it’s easier to keep track of the paths that was serialized and revert them in the target Sitecore.
Now you have an upgraded version of your content, not an upgraded site. The rest will depend largely on how customized is your solution.
Configuration Migration
Configuration files carry a lot of information about your Sitecore instance; all the customizations to Sitecore are found here. You now have vanilla configuration files with default everything. Also, you have made the discovery, compared your old Sitecore configuration files to the vanilla files for that version, and you have a list of the configuration changes that you need for your site to work properly.
Before proceeding any further, make sure that all your custom configurations are separated in clean patch files. I would do that on the old Sitecore and test that everything is still working the same way. This way whatever Sitecore configuration files you will get with the new update, your custom configurations will be separated. I move all the custom configuration files into a single folder under Include and test that everything still works as expected and showconfig.aspx isn’t changed. Git can ignore any files with .config outside that custom folder.
Solution Upgrade
If your solution is built using .Net framework older than 4.5, you will need to upgrade the .Net version of your solution. You will need to change most of the references in your solution, either for third party libraries to match the new .Net framework or to reference the new Sitecore DLLs.
I found that the best way to upgrade the solution is to create a new solution in the new Sitecore site and copy only the items we need from the old solution. It’s much easier than it sounds and it helps cleanup the site from unwanted and potentially harmful components. These are the most important areas to focus on to upgrade the solution, in other words to get your solution to build with the new Sitecore DLLs. You should expect that your site will be testable after these steps, except for Search.
- Sitecore Support DLLs
Sitecore upgrades come with a lot of bug fixes. Those bug fixes where previously Sitecore support DLLs referenced in the solution and the configuration files. You need to get an inventory of the support DLLs and compare them against the Sitecore release notes to exclude any DLL that corresponds to a bug that’s already fixed in your new version. Even if the bug wasn’t fixed in the release you’re upgrading to; chances are that the support DLL you’re using isn’t the correct one. If any DLLs remain, you should contact Sitecore support to see what the deal is.
- Build errors
There are three major sources for the build errors:
- Third party libraries incompatibility: these should be replaced with a compatible version.
- Sitecore method calls: deprecated Sitecore calls have some guidance about how to replace them.
- If you’re upgrading from 6.x to 7.0+ your lucene search code will be broken.
- Custom Sitecore
Most of these classes add business logic to the old Sitecore implementation; these have to be assessed on a case by case basis. If these classes were copying the Sitecore code of some private methods and modifying them, you need to see how that code has changed with the new version, this is one area I hope gets better with new Sitecore versions.
In case you decide to go with Sitecore point upgrades, you have to do these steps for each point upgrade you’re going through. That’s what I meant when I mentioned earlier that you need your solution to build after each point upgrade. Each of these point upgrades need to be in its own branch so that you can backtrack and when you want to deploy you will have to deploy from these branches one by one; otherwise you can’t get to the upgrade wizard page.
Search Upgrade
With Sitecore 7+ a lot has changed with Search; the use of Sitecore Content Search API is the new standard. You can continue using lucene, or you can use a different “Search Provider” such as solr. The use of Sitecore Content Search API hides most of the details about the search provider you will use and is very simple compared to anything you had to deal with before Sitecore 7. There’s a lot of discussion and documentation about Sitecore’s new search.
Coveo Search
With Sitecore 7+ you have two options if you want to use Coveo, the major difference is that Coveo Sitecore Connector 2 is an external search engine, and can be considered an in-place update for how Coveo used to work before Sitecore 7. On the other hand Coveo for Sitecore is a Sitecore search provider that’s intended to replace lucene.
Coveo Sitecore Connector 2
There is a lot of similarity between that and the “legacy” Sitecore connector; you can manage a lot of the index properties from the same web user interface for Coveo e.g. start, rebuild, schedule refreshes, manage fields…etc.
One major difference is that Coveo doesn’t use the same “web” paths it used with the legacy connector, instead it uses a Sitecore path like this one “http:///site:website/database:web/generalitem:11111111-1111-1111-1111-111111111111/generalitem:0de95ae4-41ab-4d01-9eb0-67441b7c2450/generalitem:0097ba76-41ab-40fc-acb2-86158b153be1/generalitem:fc9bf8d9-ea77-408a-96ea-51cffdd111a6/generalitem:4db19c76-2867-4793-ba68-5ac827a7d6ca/generalitem:c3983491-e86b-4e54-8401-12978a884ff0/generalitem:2207535a-66ee-4c71-9de6-9b982e487c64/localizeditem:en/versioneditem:1″
Here are the problems with such paths:
- Inclusion and exclusion filters don’t work, because they try to match wildcards to the path, which used to be a web path.
- Another one is top results, again these used to be web paths specified for a certain keyword, now they have to be Sitecore paths which can only work with a specified version of the item. This means that if the top result item has a new version, the one in Coveo needs to be updated to match that version. This isn’t practical for many reasons, for example not all content editors are aware that the item they’re working on is a Coveo top result for a number of keywords and even if they are aware of that, they usually don’t have the access to Coveo backend.
There’s another post that discusses using Coveo Sitecore Connector with Sitecore 8
Deployment
Our strategy is to setup a side by side instance that we can smoke test on the production server(s) before switching the bindings of the live site to the new instance. This strategy lends a lot from the development section:
- Setup a new Sitecore authoring site (and front ends)
- Run build job(s)
- Migrate the content: It’s better to do this during a content freeze window, which can be lengthy. If content needs to be pushed out immediately for any reason, it can still be done in the old (live) instance and then migrated to the new one.
- Rebuild all indexes.
- Smoke-test the new instance.
- Switch the live bindings to the new instance(s) in IIS and stop the old site.
In case of any unexpected behavior on the new live site, you can roll back by switching the bindings back to the old site.
Conclusion
- Discovery is your best friend
- Start with Sitecore 8
- Migrate your content using serialization
- Use patch files for all your custom configurations
- Refactor Search and fix your solution
Feel free to share your experiences with Sitecore upgrades in the comments section as well as any questions you may have!
Learn more about the latest version of Sitecore and our Sitecore upgrade services: