

Accelerating Sitecore Content Entry with the Content Export/Import Tool

Nearly every CMS implementation project requires creating or modifying content in bulk which Sitecore does not provide and out-of-the-box solution for. When a new project or initiative requires creating tens or hundreds of Sitecore content items, the task is not only tedious but can also be labor intensive and costly. Often, when a specific project requires a large number of new content items, a custom import script needs to be created to generate all of these items from a CSV file. While this can save a lot of effort for content creation, creating the import script itself can be time consuming.
The Content Export/Import Tool (CET) is a module designed to be flexible and reusable, addressing any situation where Sitecore content needs to be created or modified in bulk. The Import feature allows the user to upload a CSV file, which it uses to either create, update, publish, or delete items. It enables the user to create items and edit fields with just a CSV - which is a much faster experience than manually creating or editing hundreds of items in Sitecore. In addition to the general ease and speed of editing a CSV, it is especially useful in enabling users to modify items across the entire content tree without having to drill down into numerous folders to find items.
When we previously discussed this tool on this blog, it only allowed for content to be exported. The original Export feature can accelerate the Import-Update feature. Rather than creating the CSV file manually, you can use the Export feature to create a CSV file with every item you need to modify and each field you would like to update. The generated CSV will include the required Item Path on each line, as well as a column for each selected Field; you can then edit the Field values in the CSV and upload the edited file to run the Import.
As with the Export feature, the Import feature of the CET is designed to be accessible to any Sitecore content author, with no development skills or heavy technical skills required. This module empowers our non-technical users to make bulk content changes using a simple, user-friendly interface and a CSV file.
In this post, I will explain the four different capabilities of the Import feature, followed by two real-life client cases where I used the CET to accelerate a solution to a Sitecore content issue.
The CET Import options: Create, Update, Publish, and Delete
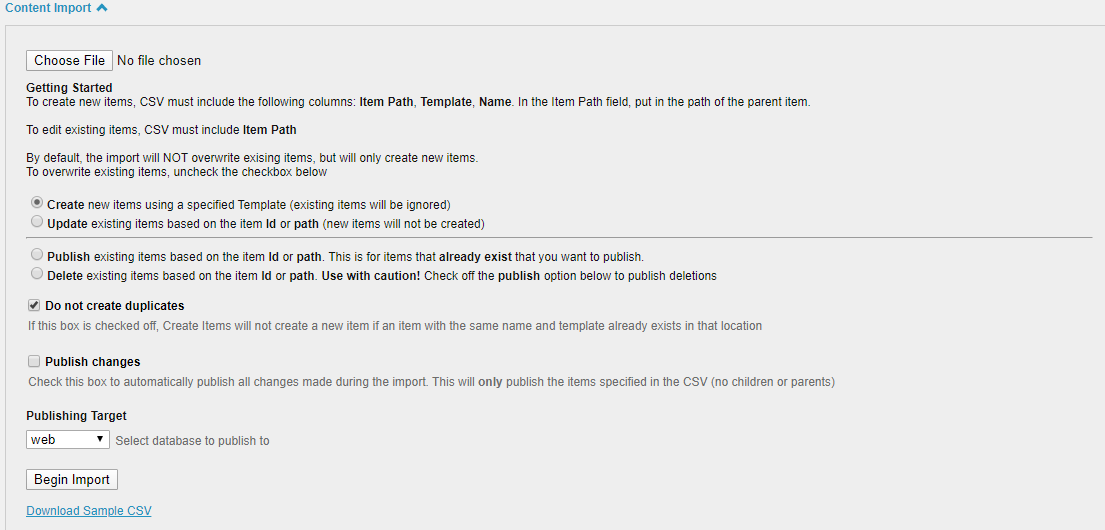
Create
The Create setting will create a new items in Sitecore for every line in the CSV. The CSV requires the following three columns:
- Item Path – the path (or ID) of the parent item to create the new item under
- Name – the name of the Sitecore Item (must follow Sitecore item naming rules, e.g. no special characters)
- Template – the name (or ID) of the template to use for the new item
In addition to the columns required to create the item, you can also include an additional column for every other field you wish to set. The Import feature can modify any field type-text, link, image, reference field - though specific formatting is required for certain types of fields (for example, reference fields require item IDs).
By default, duplicates will not be created, so if an item with the given name already exists at the given path, that line will be ignored. If you want to allow duplicates, you can uncheck the Do Not Create Duplicates box.
Update
The Update setting will modify existing items (items that are not found will be ignored). When using the Update setting, the Item Path column must be the path of the item you intend to modify, rather than the path of the parent. For this reason you cannot use the same CSV file to create and update items; if you need to update items you just created, it is recommended to use the Content Export to generate your base CSV file (more on that later).
Name and Template are not needed for updating and field modification works the same as the Create option described above.
Publish
The Publish option will not make any changes to the items in the CSV, rather it will only publish the item specified on each line. This solution solves the need to publish a large number of items that were modified but cannot publish the common root item. For example, perhaps you used the Import feature to update a number of items for a particular template all throughout the content tree, but you did not check off "Publish changes" option. You've realized that you cannot simply publish them all without either publishing the site root, which can be risky, or without manually finding and publishing each item, a very tedious task. You can use the same CSV file you just used to Update and select Publish instead to publish all of the items in the CSV.
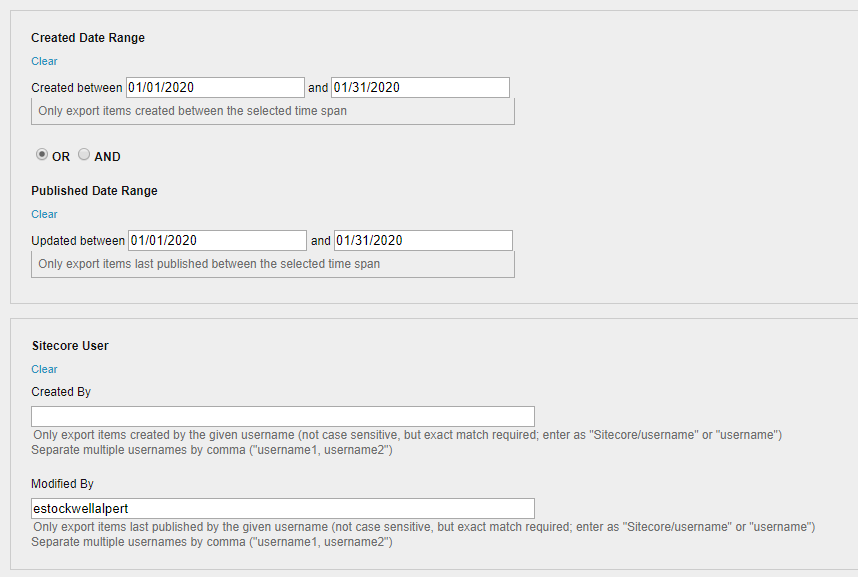
What if a content author has modified a number of pages throughout the site over the past month? Now the author wants to publish all of their changes, but they've lost track of all the pages they modified, and again, publishing the site root is too risky. They can run the Content Export with the Date and Author filters to generate a CSV of all of the items that have been created or modified by them within the past month and then run this CSV through the Import with the Publish option to publish all of these items.
The final option, Delete, will delete all of the items listed in the CSV. As with Update and Publish, the Item Path is the path of the item that will be deleted. Delete can be helpful if you need to clear out content that is found in various areas throughout the site and shares certain criteria (e.g. delete all content created before X date; delete all content created by X author, for example). Be careful and make sure to check off Publish Changes if you need these deletions automatically published, you cannot go back and use the Publish Import after using this option.
Here are a few specific use cases where the CET was able to help clients accelerate Sitecore content changes:
Case 1: Standardizing the value of a Single-Line Text field across hundreds of items
One of our clients had a content problem: They had hundreds of "Location" items spread throughout their Sitecore content tree, and these items lacked consistency across the Single-Line Text "Hours" field. Some fields displayed as "M-F 9-5", others as "Monday – Friday, 9-5", and others still as "Mon. to Fri. 9-5". All of these locations showed up in one search results page, so the lack of consistency was very noticeable, but there were hundreds of location items and they didn't all live in one folder, so not only would it be a tedious task to update all of them manually but finding all of them all would be even more tedious.
The Solution:
First, I ran the Export feature with the following settings:
Templates: Location
Fields: Hours
I did not specify the Start Item(s), as I wanted to get everything under /Sitecore/Content, which is done by default if this field is left blank.
The resulting CSV contained every Location item in the content tree and the value of the "Hours" field. It then took less than an hour to update each cell in the "Hours" column to the desired format. Once this was done, I uploaded the modified CSV file in the Import section; selected the Update option; checked off Publish Changes; and clicked Begin Import.
I used the Publish Changes checkbox because all of the items being modified needed to be published and because they were spread all throughout the content tree, it would be too risky to publish their common parent. I didn't know if the client had content changes in addition to my changes that were not scheduled to be published yet. By checking off Publish Changes I was able to guarantee that all of the Location items would be published without publishing anything else.
Case 2: Populating a new folder of "Representative" items for a newly built component
I recently worked on a project to create a listing/search page for sales representatives. This project required making a new Sales Rep template and creating Sales Rep items in the content tree to populate the listing. Creating the new template was easy, but as there were over a hundred sales reps, the client wanted to expedite creating the Sitecore content items. Rather than create each Sales Rep item manually, the client only needed to fill out a CSV file and run the import.
Because this case involved new creating items, the Item Path contained the parent item that each item was to be created under. We wanted all of the Sales Reps to live in one folder, so Item Path was the same for every line in the CSV (the path of the Sales Reps Folder). We also needed a column for Name (the item name, for which we used the Rep's full name); a column for Template (Sales Rep, also the same on every line); and a column for each field.
Most of the fields were Single-Line Text fields, which are easy to set in the CSV. A few fields were more complicated though, specifically the "Rep Type" field, which was a MultiList taxonomy field. The caveat for populating this field in the Import is that we needed to create the taxonomy items prior to running the import. Otherwise, if we tried to set the taxonomy field to an item that doesn’t exist, it would fail to set the field. With the taxonomy items created however, the field could be set either using the taxonomy item’s ID (e.g. "{4DA2D545-859B-4F2C-90EE-4451768777AC}"), or – in some cases – the taxonomy item's name (e.g. "Crop Representative"). One note to remember when using the taxonomy item's name, however. The name can only be used if the reference field has a Source specified (e.g. a source folder or query). If there is a Source, the module will look for an item from the Source whose name matches the CSV value; if there is no Source, the search would be too broad, so the item ID is required instead.
The other complicated field was the "Profile Image" , an image field. As with the MultiList field, this field required the associated images to exist in Sitecore prior to running the import. Once the images have all been uploaded into the Media Library, that column can be populated with the Media Item Path to set the image for each sales rep.
One thing to note is that if we had run the import to create the items before creating the taxonomy and image items in Sitecore, we could still use the import tool to update those in bulk once those items were created. Running the import in Update mode rather than Create would make this possible, as well as making sure the CSV contains the full item paths rather than the parent path. The easy way to do this would be to run the Export tool to generate a CSV file of all the Sales Rep items. If you're in a rush to create items but don't have all of the needed reference items yet, you can still run the import to create all of the items and go back and update those fields later once the reference items have been created.
Summary
The Content Import feature has likely saved hundreds of hours of content entry for various clients of mine. Additionally, it has enabled us to accelerate development work that would have otherwise required writing a custom import utility, and has allowed us to reduce timelines for projects requiring custom imports. In addition to accelerating projects, the Content Import empowers our clients to make bulk Sitecore content changes themselves without having to request our help (either for manual content updates or development work of custom scripts).
The latest release of the Content Export Tool is available on Github; you can also find it on the Sitecore Marketplace, and visit my personal blog for additional documentation on how to use the tool.