

Automating the Deployment of Sitecore 9.2+ Identity Server Customizations

A recent project we worked on required single sign on (SSO) to a Sitecore 9.3 CMS using Okta. Using Sitecore Identity Server, which was introduced in Sitecore 9.1.1, this customization was simple. Basically, it required the following:
- Configuring an app in Okta to handle the authentication on the Okta side
- Implementing a custom identity provider for Okta in custom code
- Creating a custom configuration file to use your new identity provider
- Deploying your custom identity provider and config file to your Identity Server
There are a number of blog posts that cover how to create the necessary custom files, so we won’t go into the details of how to create those custom files here. To create custom files, we followed this post. The tricky part was automating the last step: the deployment. It turns out that Identity Server is a .NET Core web application, not a traditional ASP.NET application, and it requires custom files to be placed in specific folders instead of just deploying them to the bin folder.
The Files and Their Locations
There are 3 files that need to be deployed to your Identity Server: your custom DLL, a Manifest file, and an XML config file. The files need to be placed in the following locations on your Identity Server:
|
File |
Folder |
|
Your Custom DLL |
[Identity Server Root]\sitecoreruntime\production |
|
Manifest File |
[Identity Server Root]\sitecore\Sitecore.Plugin.IdentityProviders.Okta |
|
XML Config File |
[Identity Server Root]\sitecore\Sitecore.Plugin.IdentityProviders.Okta\Config |
The manifest and the config file are straightforward. If you set up your Visual Studio (VS) project properly, then those two files will get deployed properly when you publish your project. The setup of my VS project looks like this:
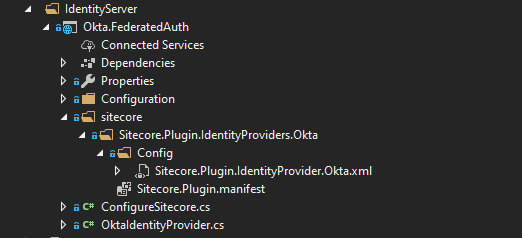
The setup for the Visual Studio project.
The difficulty is with the DLL. By default, if you publish this VS project to your Identity Server it will put the DLL at the root, and it will also overwrite the web.config file, which we don’t want to do. The solution that we developed was to use a batch file to publish the project to a temporary folder, copy the files to the necessary locations, and then delete the temporary folder.
The Solution
We use Jenkins Automation Server for automating our deployments. So, we needed batch file that we could add to the end of our Jenkins build that would take the following steps:
- Make a temporary directory somewhere that we can publish to
- Publish our .NET Core project to the temporary directory
- Copy the custom DLL to the proper location
- Copy the configuration files to their proper location
- Remove the temporary directory
The working batch file looks like this:
md C:\inetpub\wwwroot\MySitecoreCM\oktatemppublish

dotnet publish C:\Source\MyOktaProject\src\Project\IdentityServer\code\FederatedAuth\Okta.FederatedAuth.csproj --output C:\intepub\wwwroot\MySitecoreCM\oktatemppublish

xcopy C:\inetpub\wwwroot\MySitecoreCM\oktatemppublish\Okta.FederatedAuth.* C:\inetpub\wwwroot\MySitecoreIdentityServer\sitecoreruntime\production\ /y

xcopy C:\inetpub\wwwroot\MySitecoreCM\oktatemppublish\sitecore C:\inetpub\wwwroot\MySitecoreIdentityServer\sitecoreruntime\production\sitecore /i /s /e /y

rd C:\inetpub\wwwroot\MySitecoreCM\oktatemppublish /Q /S
(Of course, you will want to change the folder locations to match wherever your website and source code is located)
Once you have completed the steps above, save this batch file to some folder in your source code structure. We put ours in a tools/Okta folder. Then just add a step to your Jenkins build that looks like this:

Working in Multiple Environments
For this deployment process to work across multiple environments (Local development, Development Server, QA Server, and Production Server), you will need to use a configuration transformation process so that this batch file is updated with the proper folder locations for every environment. At Velir, we use NAnt as a build tool to manage our configuration transformations.
NAnt requires a .properties file for every environment and a .template file that is used to construct the configuration file. For this Okta integration our .properties file looks like this:

And the .template file that we used to transform our batch file looks like this:
md ${Okta.TempPublishPath}
dotnet publish ${Okta.SourceRoot}\src\Project\IdentityServer\code\FederatedAuth\Okta.FederatedAuth.csproj --output ${Okta.TempPublishPath}
xcopy ${Okta.TempPublishPath}\Okta.FederatedAuth.* ${Okta.IdentityServerRootPath}\sitecoreruntime\production\ /y
xcopy ${Okta.TempPublishPath}\sitecore ${Okta.IdentityServerRootPath}\sitecoreruntime\production\sitecore /i /s /e /y
rd ${Okta.TempPublishPath} /Q /S
By setting up the proper .properties file in every environment, we ensure that our batch file works properly and copies the necessary files to the correct locations.
This easily repeatable approach will also work for any other Identity Server customizations you may need to implement. You can use the process to automate their deployment and save yourself time for other valuable tasks. So, good luck on your next Sitecore Identity Server deployment, and happy coding!
If you found this information helpful, check out more of our thoughts on Sitecore or subscribe to our newsletter to our receive monthly insights in your inbox.